Most foundation problems have little to do with the foundation itself. The bottle might be fine, but the skin underneath is dry, the shade is a half-step off, or an entire pump of product went on in one layer.
The good news is that application is a learnable skill, and the basics are simple. This guide walks through the full process: prepping your skin, choosing a tool, applying in the right order, and fixing the things that go wrong (cakiness, patchiness, that visible line along the jaw). Along the way, I’ll point out where certain tools or products can make the process easier, and where you probably don’t need to buy anything.
Before You Start: What Foundation Can and Can’t Do
Foundation evens out skin tone and can soften the look of redness or uneven color. It doesn’t erase texture, and it won’t look identical on every skin type. A formula that glows on dry skin may slide around on oily skin, and a matte formula that looks polished on oily skin can cling to dry patches.
So the goal for a beginner isn’t “flawless.” It’s skin that looks like skin, only more even. Start with less coverage than you think you want. You can always add more.
Step 1: Prep Your Skin (This Does Half the Work)
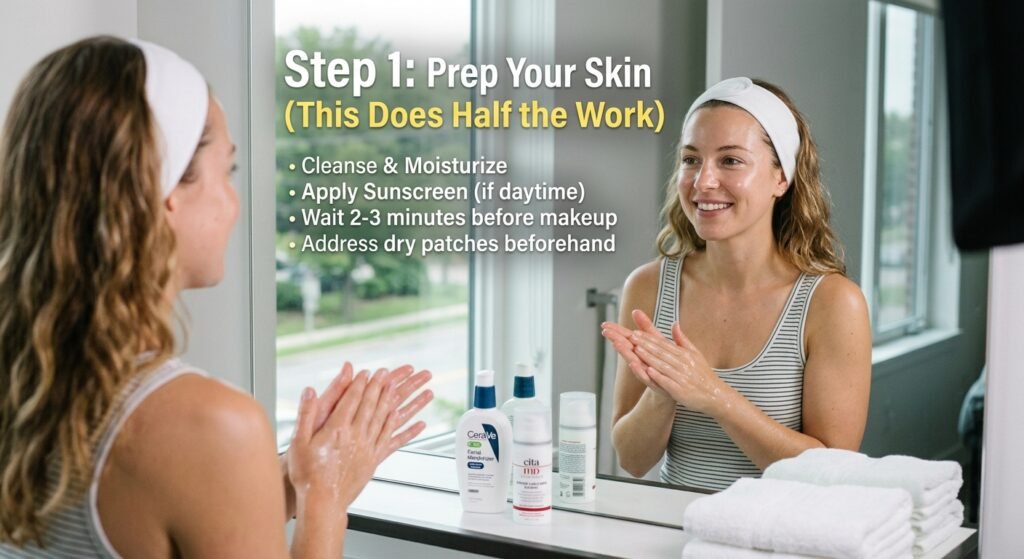
Foundation sits on top of whatever your skin looks like at that moment. Flaky, dehydrated skin will show flakes. Skin that’s still wet with product will make foundation slip.
A simple prep routine:
- Cleanse your face so it’s free of oil and residue from the night before.
- Moisturize with something lightweight enough to absorb fully. Dry skin can go richer; oily skin usually does better with a gel or lotion texture.
- Apply sunscreen if this is your daytime routine. Follow the product’s directions, then give it a few minutes to settle before foundation goes on. Layering foundation over sunscreen that hasn’t set can cause pilling or patchiness.
- Wait a couple of minutes. This is the most skipped step and the easiest fix for foundation that looks streaky.
Prep tip for dry patches: If a particular area (around the nose, between the brows) flakes, gently exfoliate the night before rather than right before makeup. Scrubbing and then immediately applying foundation often causes irritation.
Step 2: Decide Whether You Need Primer
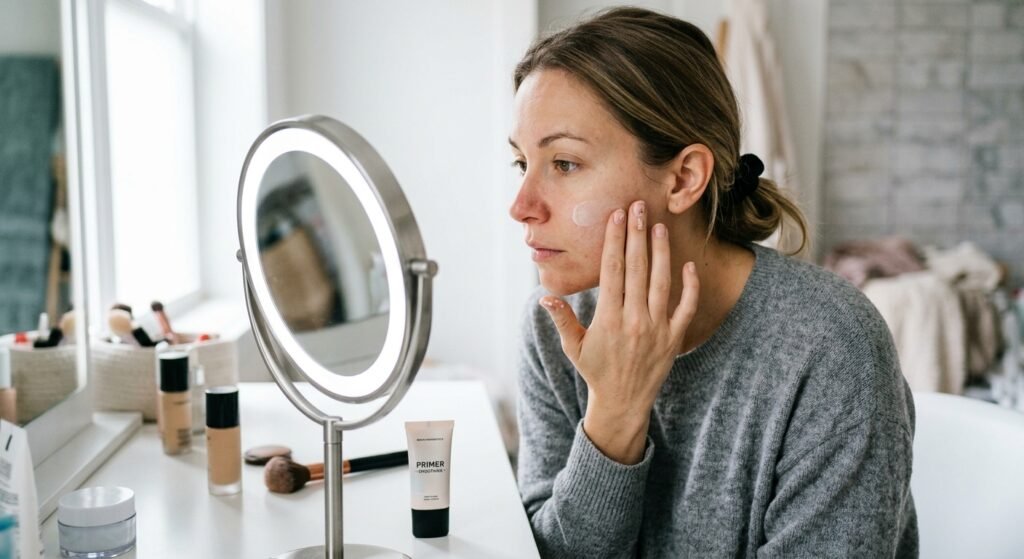
Primer is optional. It’s a product that goes between skincare and foundation to change how the foundation behaves, for example by helping it grip, smoothing the look of texture, or controlling shine in certain areas.
You may not need one if your skin looks fine with foundation by lunchtime. It becomes more useful if:
- Your foundation fades or separates on oily areas
- You want a smoother base over visible pores
- Your foundation clings to dry areas
I cover primer types in the product section below.
Step 3: Choose Your Application Tool
There are three main options, and none is the “correct” one. Each gives a different finish.
| Tool | Finish | Coverage | Learning Curve |
|---|---|---|---|
| Fingers | Natural, skin-like | Light to medium | Very easy |
| Damp sponge | Soft, blended, skin-like | Light to medium, buildable | Easy |
| Foundation brush | Smooth, more polished | Medium to full | Moderate |
Fingers
Your body heat softens the product, which helps it melt into the skin. This works well for skin tints and lightweight liquids. The drawbacks: it’s harder to get an even layer with thicker formulas, and you’ll need to wash your hands afterward.
A Makeup Sponge
Sponges tend to press product into the skin rather than move it around, which can reduce streaking. Most are used damp, since a wrung-out sponge absorbs less product.
A Foundation Brush
Brushes give more control and more coverage, but technique matters. Drag a brush too hard and you’ll see streaks.
If you’re truly starting from zero, a sponge is often the most forgiving place to begin. Read on for the product notes.
Step 4: How to Apply Foundation, Step by Step
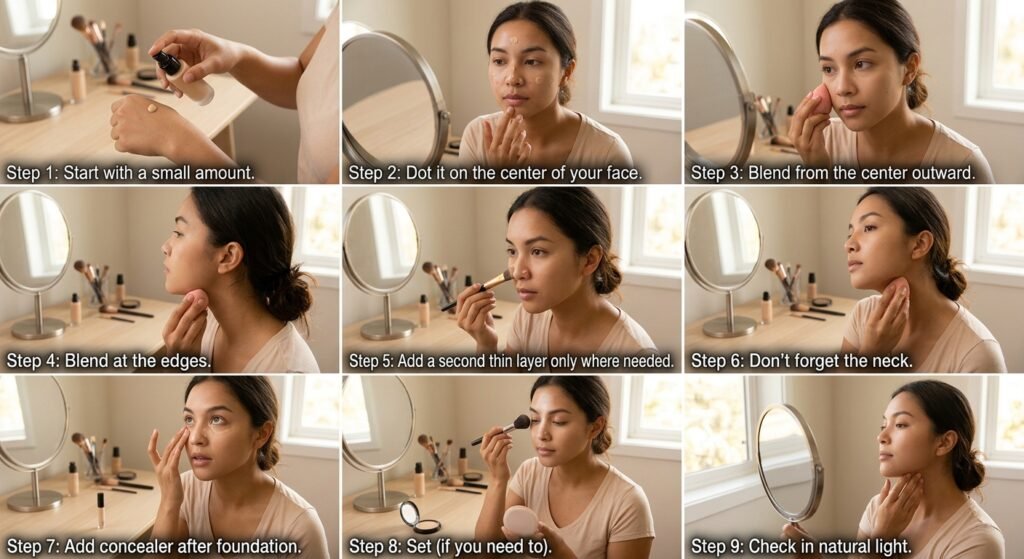
Here’s the method that works with most tools and formulas:
1. Start with a small amount
Put a pea-sized to dime-sized amount on the back of your hand or a clean palette. Working from your hand instead of straight from the bottle lets you control how much goes on.
2. Dot it on the center of your face
Place small dots on the forehead, nose, cheeks, and chin, where you generally need the most coverage. Skip the outer edges for now.
3. Blend from the center outward
- With a sponge: Bounce or press the sponge over the dots, moving outward. Avoid dragging.
- With a brush: Use short, light strokes or small circular motions. Blend in one direction at a time.
- With fingers: Press and lightly rub, using a patting motion to finish.
Starting in the center and moving out keeps the most product where you need it and lets the edges fade naturally.
4. Blend at the edges
Along the hairline, jawline, and sides of the nose, the goal is a seamless fade. Use whatever is left on your tool rather than adding more product. This is where a visible “mask” line usually comes from, so slow down here.
5. Add a second thin layer only where needed
Instead of one thick layer, build coverage in thin passes on areas with redness or discoloration. Let each layer settle for a moment before adding more.
6. Don’t forget the neck
If you’re wearing a lower neckline, blend down the jawline and onto the neck so the color transitions. You don’t need to cover the whole neck, just blur the edge.
7. Add concealer after foundation
Applying concealer after foundation usually means you need less of it, since foundation has already evened things out. Pat it onto specific spots rather than swiping.
8. Set (if you need to)
If you’re prone to shine or your makeup tends to move, lightly set the T-zone with a small amount of translucent powder. You can skip this on dry skin.
9. Check in natural light
Bathroom lighting often hides mistakes. Step near a window before you leave and look at your jawline and hairline.
Foundation for Your Skin Type
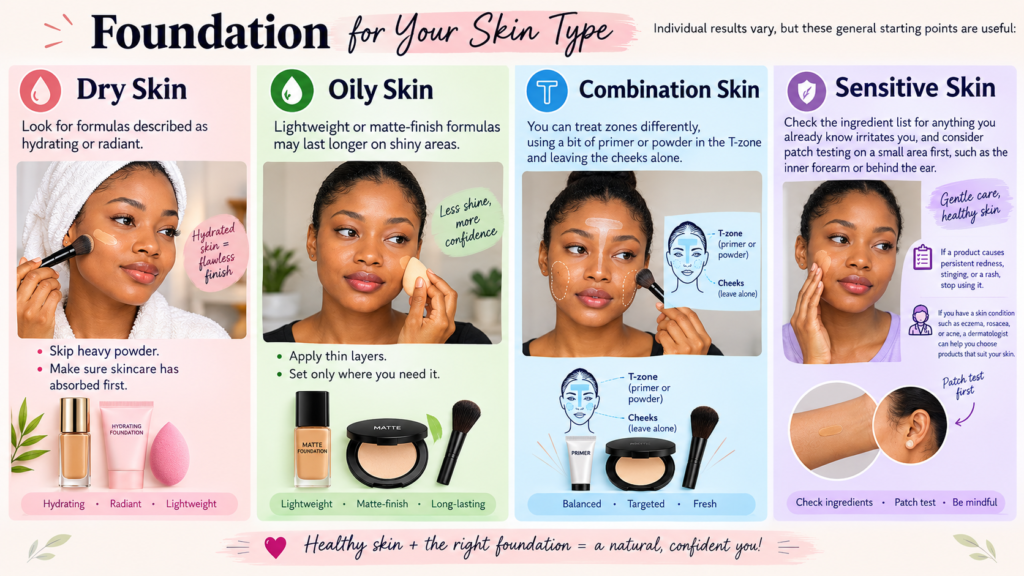
Individual results vary, but these general starting points are useful:
Dry skin: Look for formulas described as hydrating or radiant. Skip heavy powder, and make sure skincare has absorbed first.
Oily skin: Lightweight or matte-finish formulas may last longer on shiny areas. Apply thin layers and set only where you need it.
Combination skin: You can treat zones differently, using a bit of primer or powder in the T-zone and leaving the cheeks alone.
Sensitive skin: Check the ingredient list for anything you already know irritates you, and consider patch testing on a small area first, such as the inner forearm or behind the ear. If a product causes persistent redness, stinging, or a rash, stop using it. If you have a skin condition such as eczema, rosacea, or acne, a dermatologist can help you choose products that suit your skin.
Common Beginner Mistakes (and Quick Fixes)
Wrong shade. The most common problem. Test shades along the jawline, not the wrist, and look in daylight. If it’s noticeably different from your neck, try again. Many brands offer several undertones (cool, warm, neutral), so check the product page for available shades before you buy.
Too much product. Heavy application makes foundation settle into fine lines and pores. If it looks cakey, press a clean, slightly damp sponge over the area to lift extra product.
Skipping skincare. Dry or bumpy skin is more noticeable under foundation. A few minutes of prep makes a visible difference.
Dragging instead of blending. Wiping product across the face creates streaks. Press, bounce, or use short strokes.
Ignoring edges. Blend the jawline and hairline carefully so the color fades out.
Piling on powder. Too much setting powder can look flat and dry. Use a small amount, mostly in shiny zones.
Dirty tools. Sponges and brushes hold on to product and skin oils. Clean them regularly (more on this below).
Beginner-Friendly Tools and Products Worth Considering
Here’s what may be useful, along with who each one suits. None of these is mandatory. If you already own a workable tool, use it first.
Damp-Use Makeup Sponge

Best For: Beginners who want a forgiving, natural-looking finish.
Why Consider It: A teardrop-shaped sponge that expands when damp is designed for pressing and bouncing foundation into the skin, which often helps reduce streaks. The pointed tip can reach around the nose and under the eyes.
Pros:
- Generally easy to use without much practice
- Can help blend edges softly
- Works with liquid and cream formulas
Cons:
- Needs regular washing and eventually replacing
- Can absorb some foundation, so you may use a little more product
- Not ideal for very full coverage in one pass
What to Consider Before Buying: Check the listing for size, whether it’s latex-free if that matters to you, and how the seller recommends cleaning it. Multi-packs can be useful if you like to rotate them.
Verdict for This Specific Use: A sensible first tool for anyone who wants a natural finish and doesn’t want to learn brush technique. If you prefer more coverage, you may eventually want a brush too.
Flat or Buffing Foundation Brush

Best For: Readers who want more coverage or a more polished finish.
Why Consider It: Brushes let you apply thin, even layers, and many people find they use less product. A denser, flatter brush tends to give more coverage; a softer, rounder one tends to feel lighter.
Pros:
- Precise control over coverage
- Fast once you get comfortable
- Doesn’t absorb as much product as a sponge
Cons:
- Streaks are more likely if the technique is rushed
- Needs regular washing
- Bristle quality varies
What to Consider Before Buying: Look at bristle density, the handle length, and whether the brush is meant for liquid or powder products. Read the product page for cleaning guidance.
Verdict for This Specific Use: Worth considering if you like fuller coverage or want a smoother finish, or if you find sponges frustrating. It takes a few tries to get the motion right.
[View the product on Amazon — insert affiliate link]
A Starter Foundation (Skin Tint or Light-to-Medium Liquid)

Best For: Beginners who want a low-risk first foundation.
Why Consider It: Lightweight formulas are more forgiving because they don’t build up as heavily. A skin tint or a light-to-medium coverage liquid lets you practice technique without a noticeable “mask” if your shade or blending isn’t perfect.
Pros:
- Easier to blend
- Usually looks more natural
- Coverage can still be built up gradually
Cons:
- May not cover strong discoloration in one layer
- Some formulas suit particular skin types better than others
- Shade range varies by brand
What to Consider Before Buying: Check the shade range and undertone options, the finish (matte, natural, or radiant), and the ingredient list. Read the product page for whether it’s designed for dry, oily, or all skin types.
Verdict for This Specific Use: A good choice for a first foundation, especially if you’d rather add coverage than remove it. If you need high coverage for specific concerns, a fuller-coverage formula may suit you better.
[Check availability and current shade options — insert affiliate link]
Translucent Setting Powder (Optional)

Best For: Oily or combination skin, or anyone whose foundation fades quickly.
Why Consider It: A light dusting can reduce shine and help foundation stay in place.
Pros:
- Can extend wear on shiny areas
- A little goes a long way
Cons:
- Can look dry or heavy if overapplied
- Not necessary for everyone, especially with dry skin
What to Consider Before Buying: Look at whether the powder is loose or pressed, and whether it’s described as translucent or tinted. Check the ingredients if you’re sensitive.
Verdict for This Specific Use: Skip it if your skin doesn’t get shiny. If you do, a small amount in the T-zone may be all you need.
[See the latest product details — insert affiliate link]
Also Worth a Mention: Primer and Brush Cleanser
A primer may help if foundation separates or fades on you, but check that its finish (mattifying, smoothing, hydrating) matches your skin type. A brush and sponge cleanser isn’t glamorous, but clean tools blend better, and a gentle soap works too. If you already have a mild cleanser at home, you may not need a dedicated product.
Product Comparison Table
| Product Type | Best For | Key Feature | Main Advantage | Potential Drawback |
|---|---|---|---|---|
| Damp makeup sponge | Beginners, natural finish | Bounces product into skin | Forgiving, soft blending | Absorbs some product |
| Foundation brush | More coverage, polished finish | Thin layered application | Precise control | Streaks with rushed technique |
| Skin tint / light liquid | First-time foundation users | Sheer to medium coverage | Natural-looking | Limited coverage on discoloration |
| Setting powder | Oily or combination skin | Reduces shine | Helps makeup stay put | Can look dry if overused |
How to Choose Your Shade (Without Guessing)
Shade matching trips up many beginners:
- Match your jawline or neck, not your hand or wrist.
- Consider undertone. If gold jewelry flatters you and veins look greenish, you may lean warm; silver and bluish veins may lean cool; mixed results can mean neutral.
- Swatch in daylight. Store lighting and bathroom bulbs can be misleading.
- When buying online, check the size of the shade range and read the product description carefully, since shade names vary between brands.
- Consider that skin tone changes with the seasons.
If you’re between shades, it can be easier to lean lighter and adjust than to fight one that’s too dark.
Keeping Your Tools Clean
Dirty sponges and brushes can affect how foundation goes on and can bother sensitive skin. As a general rule:
- Rinse and wash sponges after use or at least weekly
- Wash brushes every one to two weeks with a mild cleanser
- Let everything dry fully before storing
- Replace sponges that crumble or smell
Follow the care instructions on the product listing where available.
FAQ
How much foundation should I use?
Start with a small amount, roughly pea-sized to dime-sized for the whole face, and add more if needed. Thin layers look more natural.
Should I apply foundation or concealer first?
Many people apply foundation first, then concealer only where needed. If you use a lot of concealer, you might reverse the order. Either can work, so try both.
Should my sponge be wet or dry?
Most people use a damp sponge, wrung out until it’s not dripping. A dry sponge may absorb more product and can give a fuller look, but results vary by sponge and formula.
Why does my foundation look cakey?
Common causes include too much product, dry skin, skipping moisturizer, or too much setting powder. Try a thinner layer, allow skincare to absorb, and press lightly with a clean, damp sponge to lift extra product.
Do I need sunscreen under foundation?
If you use daily sunscreen, it goes before foundation, and it’s worth letting it settle first. A foundation with SPF may not provide the amount of protection listed unless applied in the quantity the label assumes, so check the directions.
Conclusion
Good foundation application comes down to a few habits: prep your skin, start with a little product, blend from the center outward, and check your work in daylight. A damp sponge and a lightweight formula are generally the easiest combination for a beginner. Add a brush if you want more coverage, and powder or primer only if your skin needs them.
Your next step: pick one tool and one thin-layer technique, and practice it for a week. Try a full application when you’re not in a rush, so you can notice what works. If you’d like to shop, start with the shade range and formula type for your skin, then consider a sponge or brush. Check the current listings for sizes, ingredients, and shade options before you buy.