Some mornings you have five minutes and one makeup product within reach. Maybe you’re traveling with a carry-on, or you’ve decided your routine needs fewer steps. Foundation on its own can look intentional, polished and even pretty, if you know how to use it.
Foundation is more versatile than its label suggests. Depending on how you apply it, it can act as a sheer skin tint, a spot concealer, a soft contour or a cheek flush. Most of the difference comes from how much you use, where you put it, and what you apply it with.
This guide covers seven foundation-only looks, how to prep your skin so they sit well, how to choose a formula and shade, the tools worth having, and how to fix the problems that make one-product makeup look flat, patchy or cakey.
Why Foundation-Only Makeup Works (and Where It Falls Short)

Makeup looks “done” when the face has even tone, some dimension and a little warmth. Foundation handles the first well. Dimension and warmth take more effort, and that’s what most of the looks below address.
A few honest limitations:
- Foundation won’t add much color on its own. Cheeks and lips may look pale unless you use the tricks in Look 5 and Look 6.
- Shade matching matters more. With no blush or bronzer to distract the eye, a slightly wrong shade is more noticeable.
- Coverage is a trade-off. The more you layer for coverage, the more you risk texture sitting on the skin.
- Eyes and brows stay bare. That suits a natural look, but if you feel washed out, a quick brush of your brows with a spoolie or a bit of balm can help without adding a new product category.
Foundation-only makeup works best when you pick the finish (sheer, dewy, matte or full) first, then build the look around it.
Prep Your Skin in 60 Seconds
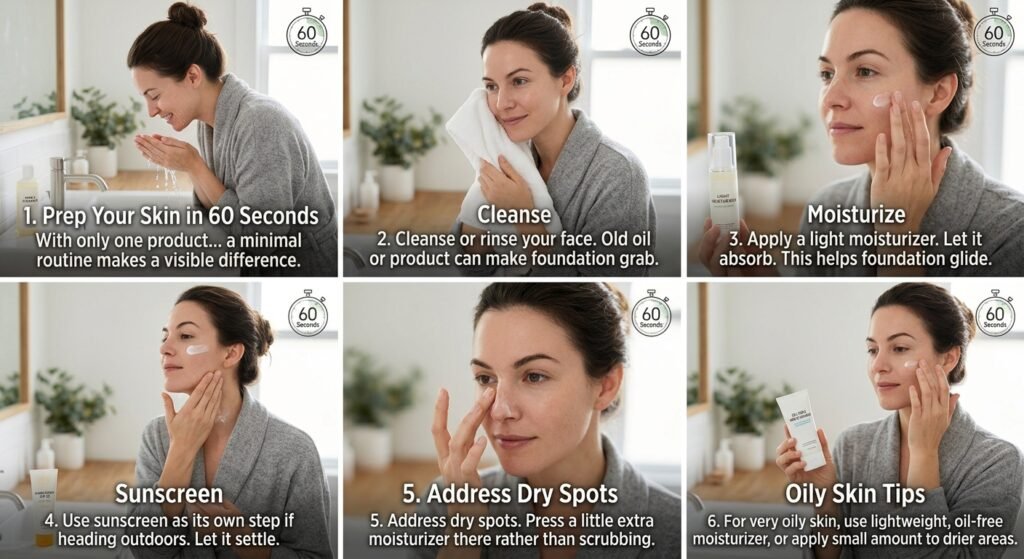
With only one product on your face, the skin underneath shows through. A minimal prep routine makes a visible difference.
- Cleanse or rinse your face. Old oil or leftover product can make foundation grab and streak.
- Apply a light moisturizer. Give it a minute or two to absorb. This helps foundation glide, and it matters most if you have dry patches.
- Use sunscreen as its own step if you’re heading outdoors. Let it settle before foundation so the two don’t pill or slide.
- Address dry spots. If flakes appear around the nose or brows, press a little extra moisturizer there rather than scrubbing.
If you have very oily skin, you may prefer a lightweight, oil-free moisturizer, or a small amount only on drier areas.
First, Choose the Right Type of Foundation
The formula you choose decides which of the looks below you can achieve. Here are the main types and what each suits.
Skin Tint or Tinted Moisturizer

Best For: Beginners, dry or normal skin, and anyone who wants a natural look.
Why Consider It: These formulas are lightweight and usually blend easily with fingers. They even out tone without hiding freckles or natural texture. [Amazon link: skin tint or tinted moisturizer]
Pros:
- Forgiving if your shade match isn’t perfect
- Quick to apply, no brush required
- Hard to overdo
Cons:
- Limited coverage for dark circles, redness or breakouts
- Some formulas may wear off faster on oily skin
What to Consider Before Buying: Check the shade range on the listing and look at customer photos across different skin tones. Some skin tints come in only a handful of shades, which can make matching harder.
Verdict for This Specific Use: A good starting point if you want the sheer looks (Look 1 and Look 3) and don’t want to think about technique.
Serum or Lightweight Liquid Foundation (Light to Medium Coverage)

Best For: Most skin types, especially people who want more coverage than a tint but not a heavy finish.
Why Consider It: These formulas can be sheer when applied lightly and build up when you need them to. That flexibility suits foundation-only routines. [Amazon link: buildable liquid foundation]
Pros:
- Adjustable coverage in one bottle
- Usually works with fingers, sponge or brush
- Often available in wide shade ranges
Cons:
- Can slip on very oily skin without a primer or powder
- Some formulas separate if not shaken
What to Consider Before Buying: Check whether the finish is described as dewy, natural or matte. Also look at the ingredient list if you have fragrance sensitivity.
Verdict for This Specific Use: This is the most flexible type for the looks below, and the one to pick if you’re only buying one product.
Stick Foundation

Best For: Travel, quick application, and anyone who wants to use foundation for dimension (contour and highlight) as well as coverage.
Why Consider It: A cream stick is easy to swipe on targeted areas, which makes it useful for Looks 5 and 6. [Amazon link: stick foundation]
Pros:
- Portable and mess-free
- Good for spot coverage and sculpting
- Easy to blend with a sponge or fingers
Cons:
- Can look heavy if applied all over without blending
- May emphasize dry patches on very dry skin
What to Consider Before Buying: Cream formulas tend to blend best while the product is still warm from your fingers. Check whether the stick is designed for full-face use or just for touch-ups.
Verdict for This Specific Use: Worth considering if you like sculpted looks or want a compact option for a bag.
Full-Coverage Matte Foundation

Best For: Oily or combination skin, special occasions, and people who want an airbrushed look.
Why Consider It: If your goal is a smooth, even finish that lasts, a full-coverage formula does the most with the least. [Amazon link: full-coverage foundation]
Pros:
- Covers redness, uneven tone and blemishes with fewer layers
- Often longer-wearing on oily skin
Cons:
- Can look heavy or dry if over-applied
- Less forgiving with shade mismatches
- May emphasize dry or textured areas
What to Consider Before Buying: Start with a small amount. Full-coverage formulas often need less product than you’d expect.
Verdict for This Specific Use: Best for Look 7, or for anyone who wants strong coverage without needing concealer.
Which Foundation Type Fits Your Skin?
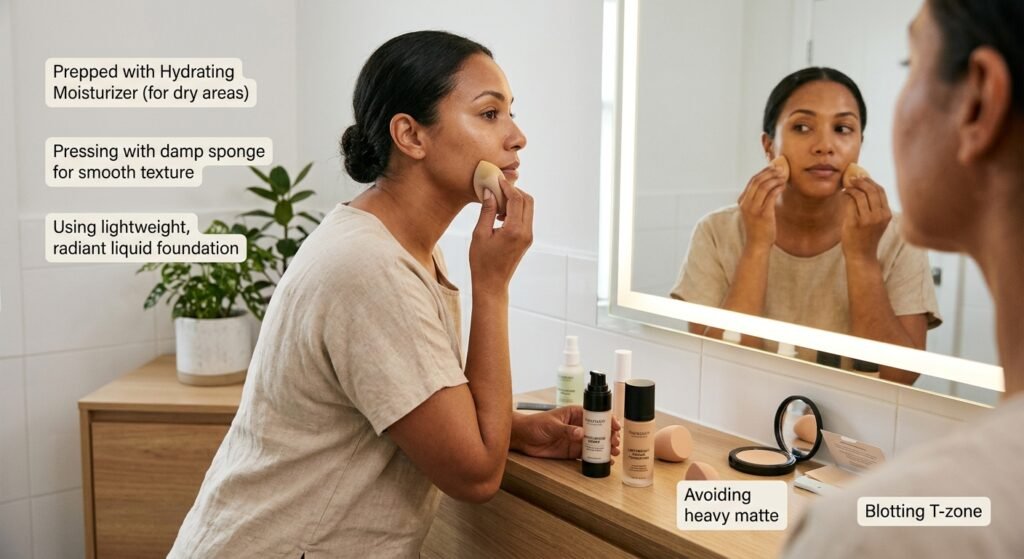
If you’re not sure where to start, this quick guide narrows it down. Treat it as a starting point, since individual skin varies.
- Dry or dehydrated skin: A skin tint, or a liquid with a dewy or satin finish. Prep with moisturizer and avoid heavy matte formulas.
- Oily skin: A soft-matte or long-wear liquid, applied thinly. Blot the T-zone rather than adding layers.
- Combination skin: A buildable liquid. Use a little more on the cheeks and less through the T-zone.
- Sensitive skin: Look for fragrance-free options and patch test. Simpler ingredient lists are easier to check.
- Textured skin or visible pores: Thin layers pressed in with a sponge tend to look smoother than heavy application with a brush.
- Mature skin: Lightweight, hydrating formulas often sit more comfortably in fine lines than very matte or heavy ones, though preferences differ.
7 Simple Makeup Looks With Just Foundation
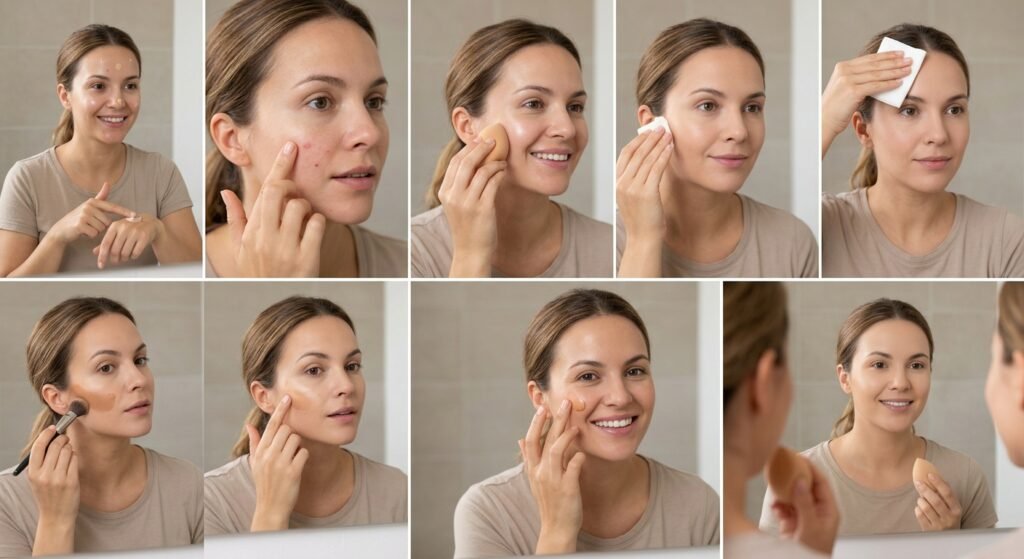
Look 1: The Sheer Skin-Tint Look
This is the easiest place to start, and it suits everyday wear.
- Start with moisturized skin (or mix a pea-sized amount of moisturizer with your foundation on the back of your hand).
- Dot a small amount on your forehead, cheeks, nose and chin.
- Blend with your fingertips using pressing and rolling motions rather than dragging.
- Skip the areas that don’t need coverage, such as the outer edges of your face.
Best for: Normal to dry skin, or anyone who dislikes the feeling of makeup.
Time: About two minutes.
Tip: Warm foundation on the back of your hand before applying. Body heat helps it melt into skin.
Look 2: Foundation as Spot Concealer
If your skin is mostly even and you only want to cover a few areas, skip full-face application.
- Apply foundation only to areas that need it: around the nose, on redness, or over a blemish.
- Use a small brush or a fingertip to tap, not swipe.
- Blend the edges outward until they disappear.
- Add a second thin layer on stubborn spots after the first has settled.
Best for: People with mostly even skin who want minimal product.
Time: About one to two minutes.
Common mistake: Rubbing back and forth. This can lift product and make blemishes look more textured.
Look 3: The Dewy Glow
This look focuses on where you place foundation as much as how much.
- Use a hydrating or dewy-finish formula.
- Apply a thin layer across the face.
- Add a little extra to the high points: tops of the cheekbones, the bridge of the nose, the center of the forehead.
- Tap with a damp sponge to press it into the skin.
Best for: Dry or dull-looking skin, and cooler months when skin needs moisture.
Time: About three minutes.
Consider: Very oily skin may find a dewy finish looks shiny within a couple of hours. Look 4 may suit you better.
Look 4: The Soft-Matte Polished Look
- Use a medium-coverage formula labeled matte or natural-matte.
- Apply with a dense brush or a slightly damp sponge for a smooth finish.
- Focus on the T-zone, where you tend to get oily, and use less on the cheeks.
- Let it set for a minute, then press a clean tissue lightly over the T-zone to lift excess product and oil.
Best for: Oily or combination skin.
Time: About four minutes.
Note: If you’re willing to bring in one extra product, a light dusting of setting powder in the T-zone can extend wear. It isn’t required for this look.
Look 5: The Sculpted Look (Two Shades of Foundation)
This one bends the “just foundation” rule slightly, since it uses your regular shade plus a second shade, but it stays within one product type.
- Apply your normal shade all over.
- Take a shade one to two levels deeper than your skin tone and press it lightly under the cheekbones, along the sides of the nose or along the jawline.
- Blend upward and outward with a sponge or brush until no hard line remains.
- Take a shade one to two levels lighter than your skin tone and tap it on the tops of the cheekbones, center of the forehead and down the nose.
Best for: Anyone who wants more shape and definition than flat coverage provides.
Time: About five minutes.
Consider: Cream and stick formulas blend more easily for this than heavily matte liquids. Start with less than you think you need.
Look 6: The Foundation Flush
Foundation on its own can leave cheeks looking pale. A deeper or warmer shade can stand in for blush.
- Apply your regular foundation first.
- Take a shade slightly deeper and warmer than your skin tone and tap a small amount onto the apples of your cheeks.
- Blend up toward the temples.
- Build slowly. Cream formulas can go from subtle to heavy quickly.
Best for: Light to medium coverage looks where you want warmth without adding a blush.
Time: About four minutes.
Note: Results depend on your shade range and undertone. This works best when the deeper shade is a warm or peachy tone, not a cool or gray one.
Look 7: The Airbrushed Full-Coverage Look
- Use a full-coverage formula and start with less than you’d expect: about half a pump for most people.
- Apply in thin layers, one area at a time, letting each layer settle before adding more.
- Blend with a damp sponge, pressing rather than wiping.
- Focus coverage on the center of the face and sheer it out toward the edges.
Best for: Events, photos, or days when you want a very even finish.
Time: About five to six minutes.
Common mistake: Applying a thick layer at once. Two thin layers almost always look smoother than one heavy one.
Which Look Should You Choose? Match It to Your Day

Different days call for different finishes. Here’s how the seven looks map onto real situations.
- Errands, gym or a casual day: Look 1 or Look 2. Minimal effort, minimal product.
- Work or a meeting: Look 4 for a polished, low-shine finish, or Look 1 if you prefer a lighter feel.
- Hot or humid weather: Look 4, with thin layers. Heavier formulas may feel uncomfortable and move around more.
- Cold, dry weather: Look 3, with a moisturizer underneath.
- Date night or dinner out: Look 5 or Look 6 for more shape and warmth.
- Photos or events: Look 7. Check your shade in daylight beforehand, since flash photography can exaggerate a mismatch.
- Travel days: A stick foundation with Look 2 or Look 6 keeps the routine small and quick.
Tools That Make Foundation-Only Looks Easier
You don’t need many tools, but the right one changes the finish.
Damp Makeup Sponge

Best For: Sheer, natural and dewy finishes.
Why Consider It: Pressing foundation into skin with a damp sponge tends to give a skin-like finish and helps prevent streaks. [Amazon link: makeup sponge]
Pros:
- Blends edges well
- Works with liquids and creams
- Usually inexpensive
Cons:
- Absorbs some product, especially when damp
- Needs regular washing and replacing to stay hygienic
What to Consider Before Buying: Check whether the listing states the sponge is latex-free if that matters to you.
Verdict for This Specific Use: A good fit for Looks 1, 3 and 6. It’s inexpensive, but plan to clean it often.
Dense Foundation or Buffing Brush

Best For: Medium to full coverage and smooth, even finishes.
Why Consider It: A brush gives more coverage and control than fingers and can work well for Looks 4 and 7. [Amazon link: foundation brush]
Pros:
- Even, controlled coverage
- Doesn’t absorb as much product as a sponge
- Easy to clean
Cons:
- Can leave streaks if the technique is rushed
- Takes some practice to blend well on textured skin
What to Consider Before Buying: Look for brushes with soft, densely packed bristles. Check reviews for shedding.
Verdict for This Specific Use: Useful if you prefer fuller coverage. Skip it if you mostly want sheer looks, since fingers work well there.
Your Fingers
They’re free, they warm the product, and they suit sheer looks. They won’t give as flawless a finish as a sponge or brush on full-coverage looks, but for skin-tint styles, they’re often enough.
Keeping Tools Clean
Sponges and brushes collect oil, product and bacteria. Wash brushes with a gentle soap or cleanser about once a week, and sponges after every few uses. Let both dry fully. A dirty tool can cause streaky application and, for some people, irritation or breakouts.
Product Comparison Table
| Product Type | Best For | Key Feature | Main Advantage | Potential Drawback |
|---|---|---|---|---|
| Skin tint / tinted moisturizer | Beginners, dry skin | Lightweight, sheer | Forgiving, easy to blend | Limited coverage |
| Buildable liquid foundation | Most skin types | Adjustable coverage | Most flexible option | May slip on very oily skin |
| Stick foundation | Travel, sculpting | Portable cream format | Easy for contour and blush tricks | Can look heavy if not blended |
| Full-coverage matte | Oily skin, events | High coverage | Even finish with fewer layers | Less forgiving of shade mismatch |
| Damp sponge | Natural finishes | Soft, pressing application | Skin-like finish | Absorbs product; needs cleaning |
| Dense brush | Fuller coverage | Controlled application | Smooth, even finish | Needs technique |
Check each Amazon listing for current shade range, size, ingredients and pricing before buying.
How to Pick the Right Shade
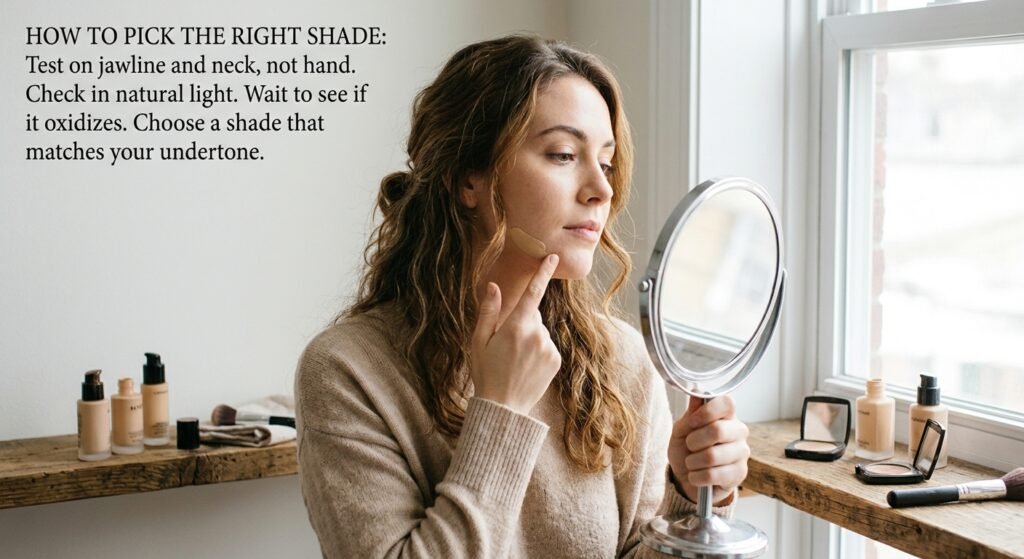
A shade that’s off is the fastest way to make a foundation-only look appear obvious.
- Test on your jawline and neck, not your hand. Your hand is usually a different color from your face.
- Check in natural light. Store lighting and bathroom lighting can distort color.
- Notice undertone. Warm skin tends to look better in golden or peachy foundations, cool skin in pink-leaning ones, and neutral skin in shades that don’t lean strongly either way.
- Wait a few minutes. Some formulas oxidize (darken slightly) after application.
- When buying online, read reviews from people with similar skin tone and undertone, and check the return policy.
If you’re between two shades, the lighter one is often easier to correct with a warmer product than the reverse, though this varies by formula.
A Simple Undertone Check
Look at the veins on the inside of your wrist in daylight. Greenish veins often suggest a warmer undertone, bluish or purplish veins a cooler one, and a mix of both a neutral undertone. This isn’t foolproof, since skin tone, lighting and other factors affect what you see, but it gives you a helpful starting point when reading shade descriptions.
Your Skin Changes With the Seasons
Many people find their skin looks lighter in winter and deeper in summer. If a shade feels slightly off at certain times of year, owning two shades and mixing them, or using the lighter one with a touch of the deeper one, can keep the match closer year-round.
Fixing Common Foundation Problems
Even careful application goes wrong sometimes. Here’s how to handle the usual culprits without adding more products.
It looks patchy or clings to dry spots.
Press a little moisturizer onto the area with your fingertips, then gently tap the foundation over it. Avoid rubbing, which drags product around.
It looks cakey.
You’ve likely used too much. Tap the area with a clean, slightly damp sponge to lift and redistribute product.
It’s too dark or too light.
For a small mismatch, blend down the neck and onto the ears or chest for a more seamless transition. If it’s noticeably off, the practical answer is usually a better shade for next time, or mixing with a second shade.
It has separated or settled into lines.
Tap with a clean sponge or fingertips to press it back into the skin. Using less product next time typically helps.
It looks shiny by midday.
Blot with a tissue or blotting paper instead of adding more foundation. Reapplying over oil can create a heavy, uneven look.
It’s rubbed off around the nose or chin.
Tap a small amount back onto only those areas rather than reapplying everywhere.
Common Mistakes With Foundation-Only Makeup
- Applying too much at once. Thin layers blend better and look more natural.
- Skipping skin prep. Dry or flaky skin can make foundation cling in patches. A light moisturizer first helps for many people.
- Stopping at the jawline. Blend down onto the neck so there’s no visible edge.
- Using a formula that doesn’t suit your skin type. A heavy matte on dry skin or a dewy formula on very oily skin can work against you.
- Ignoring undertone. Depth matching alone isn’t always enough.
- Relying on SPF in foundation. Foundation with SPF is not a replacement for a properly applied sunscreen. It usually isn’t applied thickly enough to deliver the labeled protection.
- Skipping the hairline and ears. A quick blend at the edges prevents a mask-like look.
- Never cleaning tools. Old product buildup affects both finish and skin comfort.
A Five-Minute Foundation-Only Routine
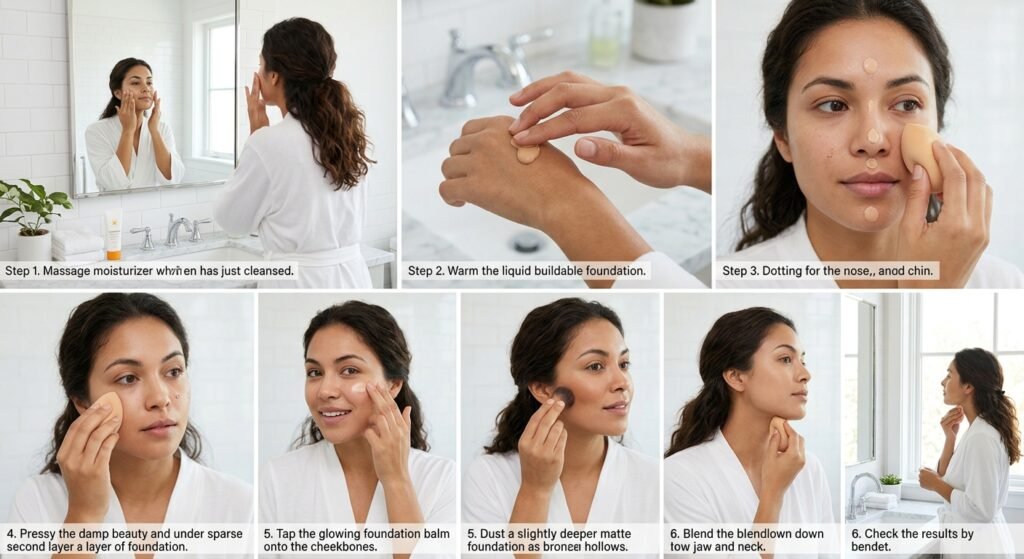
If you want one repeatable routine, this is a reliable default:
- Cleanse and moisturize (add sunscreen if you’re going outside).
- Warm a small amount of buildable foundation on the back of your hand.
- Dot it on the center of your face and blend outward with a damp sponge.
- Add a second thin layer only where you want more coverage.
- Tap a little extra on your cheekbones for glow, or a slightly deeper shade on your cheeks for warmth.
- Blend down the jawline and neck, then check in natural light.
From there, you can adjust for finish, coverage and occasion using the looks above.
Safety and Skin Notes
- Patch test new products. Apply a small amount along the jawline or behind the ear and wait 24 hours if you have sensitive skin or allergies.
- Read the ingredient list, especially if you’re avoiding fragrance or specific ingredients.
- Follow the product’s usage instructions, and stop using it if you notice irritation.
- Individual results vary. How a formula looks and wears depends on your skin type, prep and climate.
- Remove foundation at the end of the day. Leaving makeup on overnight can leave skin feeling clogged or irritated for some people.
- If you have acne, rosacea or another skin condition, consider asking a dermatologist which formulas suit you.
FAQ
Can I use foundation as concealer?
Often, yes. A thicker or full-coverage formula applied in a small, tapped layer can cover blemishes or redness. Under the eyes, very matte formulas can look dry, so a creamier product is usually kinder there.
Does foundation-only makeup look natural?
It can, particularly with sheer formulas, thin layers and careful blending. The finish depends on your formula and application more than on the number of products.
How do I stop foundation from looking cakey?
Prepare the skin with moisturizer, use less product than you think, apply in thin layers and blend with a damp sponge or fingers.
How do I make foundation last without powder or setting spray?
Use a formula suited to your skin type, apply thin layers, and blot excess oil with a tissue. Longer wear is easier with matte or long-wear formulas, though results vary.
Can I use foundation on my cheeks like blush?
A slightly deeper, warmer shade can add a subtle flush. It works best with cream formulas and small amounts blended well.
Should I buy one shade or two?
One is enough for most looks. A second shade only matters for Looks 5 and 6, or if your skin changes noticeably between seasons.
Is it better to apply foundation with fingers, a sponge or a brush?
Fingers suit sheer, natural looks. A damp sponge gives a skin-like finish. A brush suits fuller coverage. There’s no single best option, and it comes down to the look you want.
Can I wear foundation every day?
Many people do. If your skin feels irritated, congested or dry, try a lighter formula, skip days when you can, and make sure you remove it thoroughly each night.
Conclusion
Foundation alone can cover many of your makeup needs. Pick a finish first (sheer, dewy, matte or full coverage), then choose a formula and tool that fit your skin type. Prep matters more than most people expect, and thin layers almost always beat one heavy one.
If you’re a beginner, a skin tint or buildable liquid with your fingers or a damp sponge is a low-stress starting point. If you like more definition, a stick foundation or a second shade opens up the sculpted and flushed looks.
A sensible next step is to decide which of the seven looks appeals to you most, then check current Amazon listings for the matching formula type, reading shade ranges, ingredient lists and customer photos before you buy. Try one look for a week before adding anything else to your routine. Often, one well-chosen product is all you need.