If your hair still feels dry, frizzy, or lifeless after slathering on oil, you’re not imagining it — you’re probably using the wrong oil, the wrong amount, or the wrong technique.
Hair treatment oil has a reputation problem. Half the internet treats it like a miracle in a bottle; the other half insists it just makes hair greasy. The truth sits in the middle: the right oil, used the right way, can genuinely repair dryness, calm frizz, protect against heat and color damage, and support healthier growth over time. The wrong oil (or the right oil used badly) just sits on your strands doing nothing but weighing them down.
This guide breaks down what hair treatment oil actually does, how to match one to your hair type and goal, the application methods that separate “shiny and soft” from “flat and oily,” and a few mistakes almost everyone makes at least once.
What Hair Treatment Oil Actually Does (And What It Doesn’t)
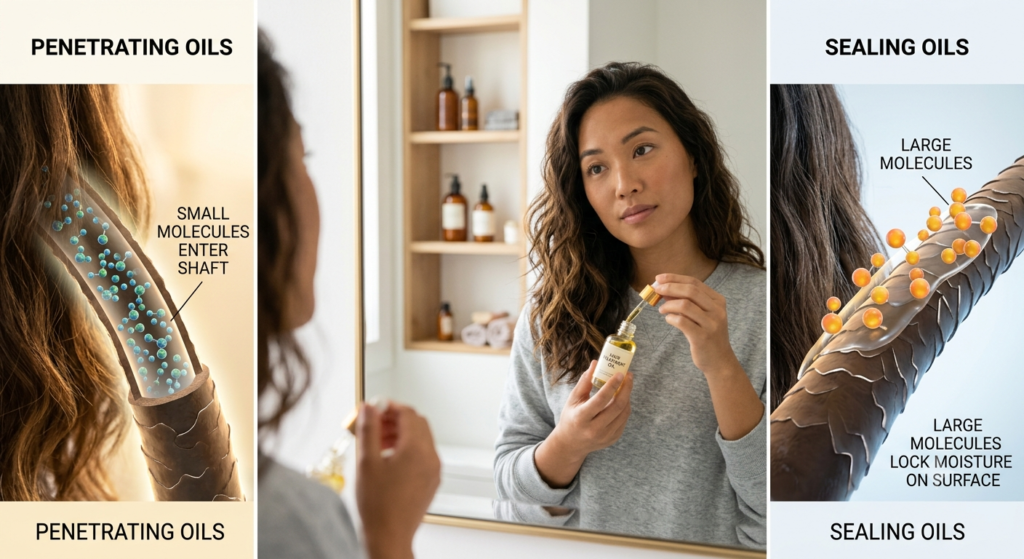
Hair treatment oil works in one of two ways, depending on its molecular size:
- Penetrating oils (coconut, olive, avocado) have small enough molecules to slip into the hair shaft, reducing protein loss and moisture loss from the inside.
- Sealing oils (jojoba, argan, sunflower) sit on the outside of the hair shaft, smoothing the cuticle and locking in moisture that’s already there.
This distinction matters more than most product labels let on. If your hair is dry because it’s losing moisture too fast, you need a sealing oil. If it’s dry because it never absorbed enough moisture to begin with, you need a penetrating oil first, followed by a sealant.
What hair oil won’t do: reverse split ends (it can only smooth them temporarily), replace conditioner, or make chemically damaged hair “healthy” again. Oil treats the outer condition of the hair you already have — it doesn’t rebuild internal protein structure the way a bond-repair treatment does. Setting that expectation early prevents a lot of disappointment.
There’s also a texture difference worth understanding before you buy anything. Sealing oils tend to feel silkier and lighter on the hand, which is why they’re marketed so heavily for “shine” — but that same lightness means they evaporate or wear off faster over the course of a day, especially in humid weather. Penetrating oils feel heavier straight out of the bottle, but because they’ve actually bonded with the internal fiber, a little goes further and the effect lasts through more than one wear. Neither type is objectively better; they solve different problems, which is exactly why so many people end up disappointed with a product that works beautifully for a friend but does nothing for them.
How to Choose the Right Hair Treatment Oil for Your Hair Type
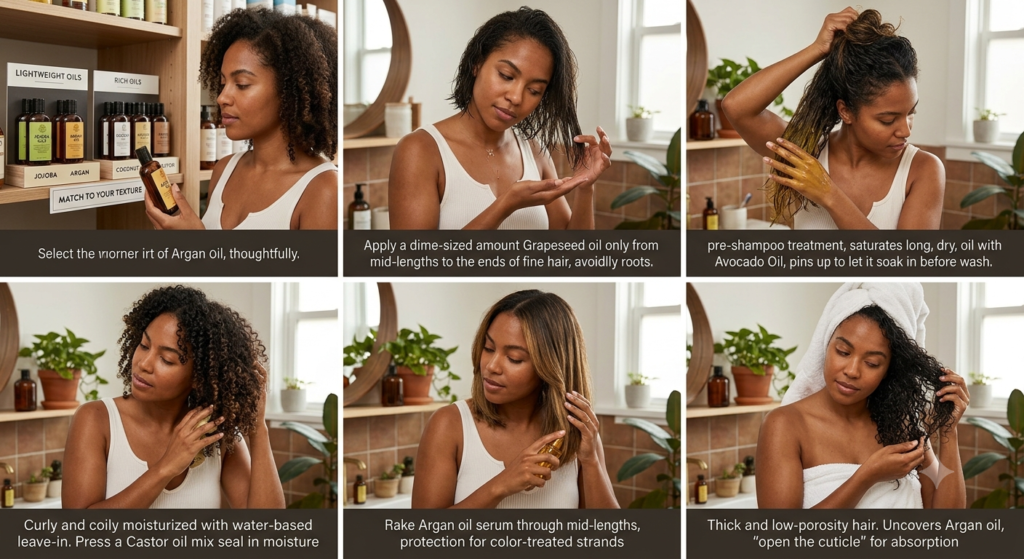
Not every oil suits every head of hair, and this is where most people go wrong — they buy whatever oil is trending instead of matching it to their actual texture and porosity.
Fine or Oily Hair
Look for lightweight oils: jojoba, grapeseed, or argan. These absorb quickly without leaving residue. Apply only from mid-length to ends, never at the roots, and use a dime-sized amount at most.
Dry or Damaged Hair
Richer, more emollient oils work best here: coconut, avocado, or marula oil. These hold up to a full pre-shampoo treatment or overnight mask without evaporating or getting absorbed too fast.
Curly or Coily Hair
Curl patterns naturally resist moisture retention because the twists in the strand make it harder for natural scalp oils to travel down the hair shaft. Castor oil, shea-infused oils, or coconut oil used generously as a sealant after a water-based leave-in tends to work better than oil alone.
Color-Treated or Chemically Processed Hair
Processed hair has a compromised cuticle, so it loses moisture fast. Argan oil and rosehip oil are popular here because they’re rich in antioxidants and fatty acids without the heaviness of coconut oil, which can sometimes strip color-treated strands with repeated heavy use.
Thick or High-Density Hair
Thick hair often gets lumped in with “dry hair” advice, but the real issue is usually distribution, not moisture level. A rich oil applied unevenly leaves some sections greasy and others still parched. Avocado or olive oil, applied section by section with a wide-tooth comb to distribute it evenly, tends to outperform simply raking a heavier oil through all at once. Thick hair can also usually tolerate slightly more product overall without looking weighed down, since the sheer volume of strands absorbs the excess.
Low-Porosity Hair
This one gets overlooked constantly. Low-porosity hair has a tightly bound cuticle that resists letting anything in — oil included. If you’ve ever felt like oil just “sits” on top of your hair without soaking in, low porosity is often the reason, regardless of how dry your hair actually is underneath. Applying oil to slightly warm, damp hair (a warm towel wrap for a few minutes first helps) opens the cuticle enough for it to actually absorb rather than just coat.
Hair Growth: Where the Evidence Actually Stands

This is one of the most searched — and most misunderstood — reasons people buy hair treatment oil, so it deserves an honest answer rather than a marketing one.
No oil grows hair out of a dormant follicle. What oils can do is create a better environment for the hair that’s already growing:
- Rosemary oil has some clinical support for improving scalp circulation, with one often-cited study showing results comparable to low-dose minoxidil over six months — though sample sizes were small.
- Castor oil has no strong clinical backing for growth itself, but its thickness coats strands and reduces breakage, which makes hair appear to grow faster simply because less of it is snapping off.
- Peppermint oil shows some early animal-study evidence for follicle stimulation, but human data is limited.
The realistic takeaway: oil supports the conditions for growth (less breakage, healthier scalp, less friction damage) more than it triggers new growth directly. If length retention is your actual goal, that distinction should shape your expectations.
It’s also worth separating two things people constantly conflate: hair growing and hair getting longer. Hair grows from the follicle at a fairly fixed rate regardless of what you put on it — genetics and overall health drive that far more than any topical product. What oil actually influences is how much of that growth you get to keep. Reducing breakage from brushing, heat, and friction against pillowcases or clothing means more of the hair that grows each month survives to add visible length, rather than snapping off before it ever gets long. That’s a meaningful benefit — it’s just a different mechanism than the one implied by “grows hair faster” marketing.
How to Apply Hair Treatment Oil the Right Way
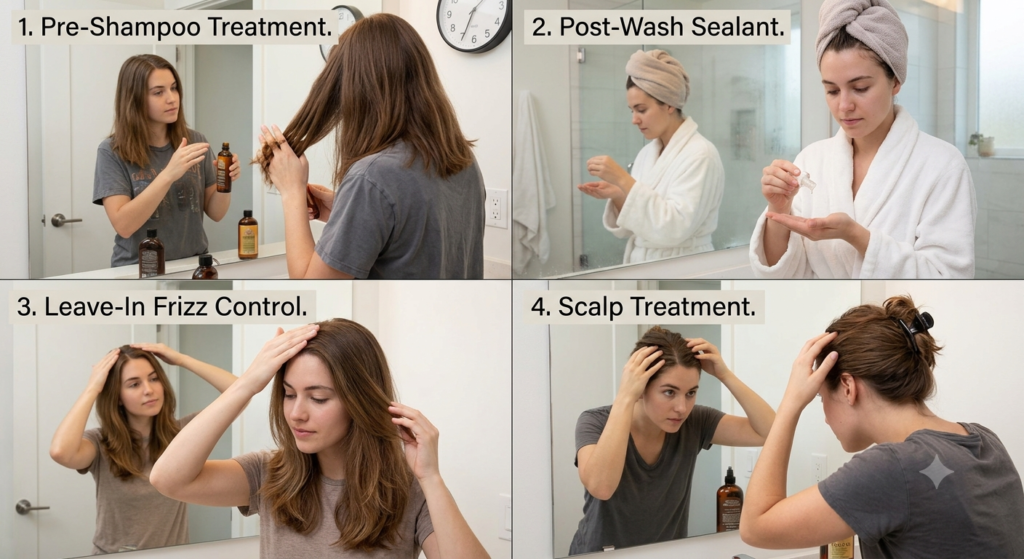
Application method changes the outcome more than the oil itself does. Here are the four main approaches:
1. Pre-Shampoo Treatment
Apply oil to dry hair 30 minutes to overnight before washing. This protects the hair shaft from the swelling and cuticle-lifting that shampoo causes, which is especially useful for high-porosity or color-treated hair.
Steps:
- Section hair and apply oil generously from mid-shaft to ends.
- Cover with a shower cap for 30+ minutes (or sleep in it overnight with a towel on your pillow).
- Shampoo twice to fully remove the oil before conditioning.
2. Post-Wash Sealant
Apply a small amount of lightweight oil to damp hair after conditioner, before styling. This locks in the water your conditioner just added.
3. Leave-In Frizz Control
A few drops rubbed between palms and smoothed over dry or damp hair to control flyaways. This is a finishing step, not a treatment — use the smallest amount that tames frizz without looking wet.
4. Scalp Treatment
Massaged directly into the scalp (not the lengths) to address dryness, flaking, or to support the growth conditions mentioned above. Leave for at least 20 minutes before shampooing out.
Common pairing mistake: using a rich pre-shampoo oil and a heavy leave-in oil on the same day. That’s the combination that actually causes the greasy, weighed-down look people blame on “oil in general.”
Common Mistakes People Make With Hair Treatment Oil
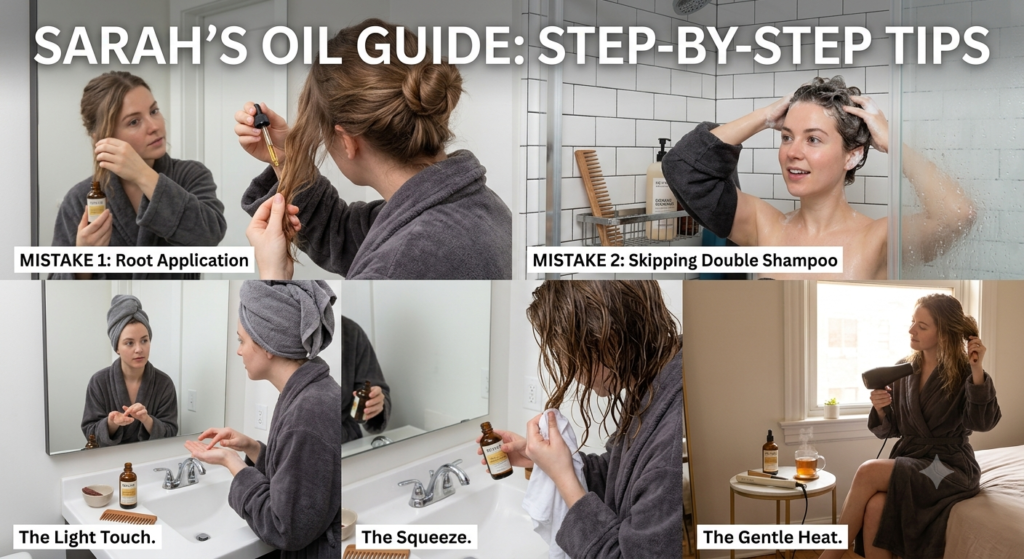
- Applying oil to the roots on fine hair. This is the single fastest way to look unwashed by hour four. Keep oil at mid-length and below unless it’s a dedicated scalp treatment.
- Skipping the double-shampoo after an oil treatment. One wash usually isn’t enough to remove oil fully, leaving a dulling residue that builds up over multiple uses.
- Using too much, too often. More isn’t more with oil — over-oiling can actually suffocate the scalp barrier and contribute to buildup-related shedding.
- Applying oil to soaking wet hair expecting it to seal in moisture. Oil doesn’t mix with water well; it needs damp (not dripping) hair to actually adhere and seal properly.
- Ignoring porosity. Low-porosity hair (tight cuticles) often just sits under oil without absorbing it — for this hair type, apply oil to slightly warm, damp hair, since heat helps the cuticle open enough to let it in.
Building a Hair Oil Routine Around Your Actual Goal
| Goal | Best Oil Type | Application Method | Frequency |
|---|---|---|---|
| Frizz control | Argan, jojoba | Leave-in, few drops | Daily as needed |
| Deep repair | Coconut, avocado | Pre-shampoo overnight mask | 1–2x per week |
| Shine boost | Grapeseed, jojoba | Post-wash sealant | After every wash |
| Scalp health / growth support | Rosemary, castor | Scalp massage | 2–3x per week |
| Heat protection | Argan, marula | Pre-styling, small amount | Before each heat styling session |
Most people don’t need five different oils — they need one multipurpose oil (argan or jojoba tends to flex best across goals) plus one specialty oil for their specific concern.
DIY Hair Oil Treatments You Can Make at Home
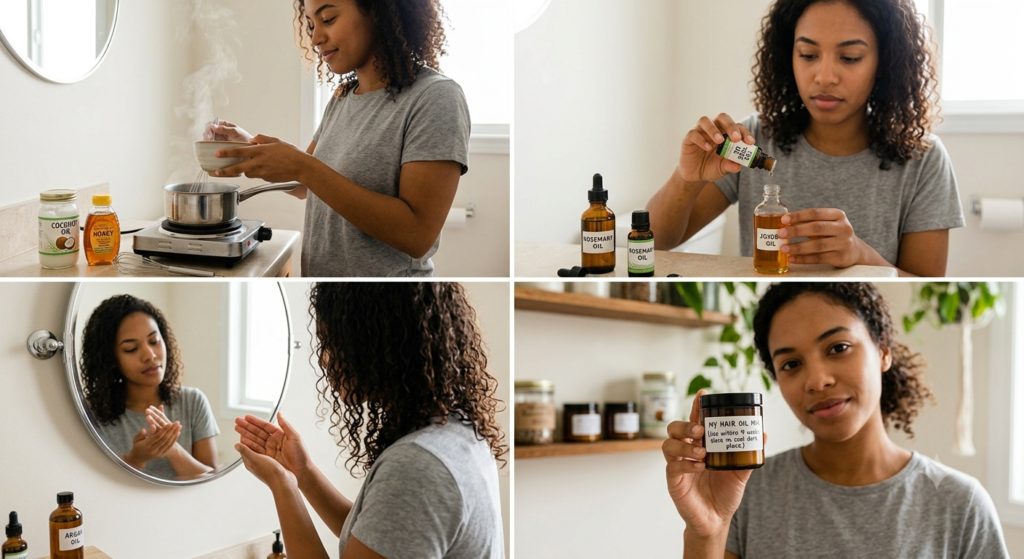
You don’t need an expensive blend to get real results. These three combinations cover the most common concerns:
For dryness and dullness: Mix 2 tablespoons coconut oil with 1 tablespoon honey. Warm slightly, apply to dry hair, leave 30–45 minutes, then shampoo twice.
For scalp buildup and mild flaking: Combine 1 tablespoon jojoba oil (it closely mimics natural sebum) with 3–4 drops of tea tree oil. Massage into the scalp only, leave 15 minutes, then wash as normal.
For growth-supportive scalp massage: Blend 2 tablespoons castor oil with 5 drops rosemary oil. Massage into the scalp for 3–5 minutes twice weekly to support circulation.
A quick note on essential oils in DIY blends: always dilute them in a carrier oil first, and patch-test on your inner arm 24 hours before applying to your scalp. Undiluted essential oils are a common — and avoidable — cause of scalp irritation.
For heat protection before styling: Combine 1 tablespoon argan oil with 1 teaspoon marula oil (or use argan alone if that’s all you have). Rub a few drops between your palms and smooth over damp hair before blow-drying or using hot tools. This won’t fully replace a dedicated heat-protectant spray, but it adds a meaningful buffer against moisture loss for anyone styling with heat several times a week.
One thing DIY blends can’t replicate well is shelf stability. Store-bought oils typically include stabilizers that prevent rancidity; homemade blends don’t, so mix small batches (a few uses’ worth) rather than large jars meant to last months. Keep DIY oil blends in a cool, dark place and use within four to six weeks — rancid oil not only smells off, it can irritate the scalp and strip shine rather than add it.
How Often Should You Oil Your Hair?
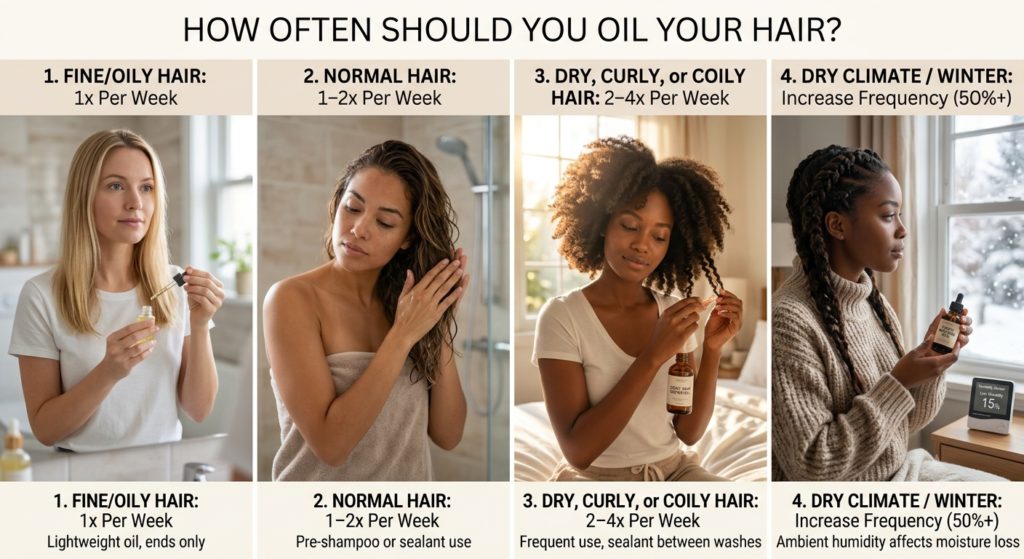
This depends heavily on hair type and climate, not a universal rule:
- Fine/oily hair: 1x per week, lightweight oil only, ends only.
- Normal hair: 1–2x per week, standard pre-shampoo or sealant use.
- Dry, curly, or coily hair: 2–4x per week, often including daily light sealant use between washes.
- Very dry climates or winter months: Increase frequency by roughly 50% across all hair types, since ambient humidity affects how fast hair loses moisture.
Signs Your Hair Treatment Oil Isn’t Working For You
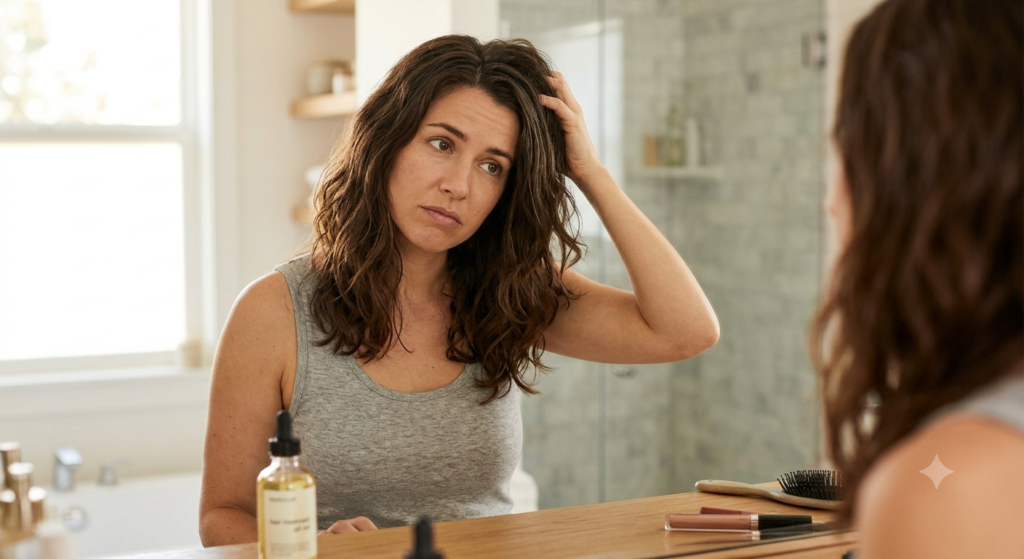
If you’ve been consistent for 3–4 weeks and you’re seeing any of the following, it’s worth switching your approach rather than pushing through:
- Hair feels heavier or looks flatter than before you started
- Increased breakouts along the hairline (oil transferring to skin)
- Persistent greasy roots by midday, even with minimal product
- No improvement in dryness or frizz at all
Usually this means either the oil is too heavy for your hair’s porosity, you’re applying too much, or you’re applying it in the wrong spot (roots vs. ends). Switching from a penetrating oil to a sealing oil, or vice versa, solves this more often than switching brands within the same category.
FAQ
Can I leave hair oil in overnight every night? For most hair types, no — nightly overnight oiling can lead to buildup and a dull, weighed-down look. Reserve overnight treatments for 1–2x weekly and use lighter leave-in amounts the rest of the week.
Does hair oil work on natural, unprocessed hair the same way it works on color-treated hair? The core mechanism is the same, but color-treated hair typically has a more porous, damaged cuticle, so it tends to absorb (and lose) oil faster, often requiring more frequent light applications rather than fewer heavy ones.
Is coconut oil bad for some hair types? It can be, particularly for fine, low-porosity hair, where its high absorption rate combined with protein content can lead to protein buildup and drier-feeling strands over time if overused.
Conclusion
Hair treatment oil isn’t a one-size-fits-all fix — it’s a tool that only works when it’s matched to your hair type, your specific goal, and the right application method. Fine hair needs lightweight sealants at the ends; dry or curly hair needs richer oils applied more generously; color-treated hair needs oils that support the cuticle without stripping tone.
Start with one multipurpose oil suited to your hair type, apply it using the method that matches your actual goal (pre-wash, sealant, or scalp treatment), and give it three to four weeks before judging results. If you’re still not seeing improvement, revisit porosity and application spot before switching products entirely — the fix is often technique, not the oil itself.