Most bad at-home haircuts don’t happen because the person lacked skill. They happen because the tools weren’t right for the job — dull shears dragging through hair, a comb that generates static, clippers with a guard that doesn’t lock in place halfway through the cut.
Walk into a professional salon’s tool drawer and you’ll notice something: every item has a specific job. Nothing is multi-purpose “just in case” gear. That’s the mindset this guide is built around. Instead of listing every gadget you could theoretically buy, it breaks down what each tool actually does, when you need it, and when you’re wasting money buying it.
Whether you’re assembling your first hair cutting tools kit for home use, shopping for a barber-style setup, or trying to figure out what separates a $15 pair of scissors from a $150 pair, this covers it.
Why the Right Hair Cutting Tools Matter More Than Technique
A sharp, well-balanced tool does about 70% of the work for you. This isn’t an exaggeration — it’s mechanical reality.
Dull scissors don’t cut hair cleanly; they bend and crush the shaft before the blades meet, which is why cuts made with cheap or worn shears often look “fuzzy” at the ends within a few weeks. Split ends aren’t always a sign of damaged hair. Sometimes they’re a sign of damaged scissors.
The same logic applies to clippers. A clipper with weak torque will bog down in thick or wet hair, forcing you to go over the same section repeatedly — which is how uneven fades and visible line-of-demarcation marks happen, even when the person holding the clippers knows what they’re doing.
The takeaway: tool quality sets the ceiling on your results. Technique determines how close you get to that ceiling. You can’t out-skill a bad tool.
The Core Hair Cutting Tools Set: What’s Actually Essential

A genuinely useful hair cutting tools set is smaller than most retail bundles suggest. Here’s what earns a permanent spot:
- Cutting shears (5.5–6.5 inch) — for dry or damp cutting, shaping, and precision work
- Thinning/texturizing shears — for blending, removing bulk, and softening blunt lines
- Clippers with adjustable taper lever — for fades, tapers, and bulk removal
- Trimmer (T-blade) — for edges, necklines, hairlines, and detail work clippers can’t reach cleanly
- Wide-tooth and fine-tooth combs — for detangling and precise sectioning
- Sectioning clips — for controlling hair while you work on one panel at a time
- A cutting cape and spray bottle — not glamorous, but they directly affect how evenly you can see and cut
What Most Starter Kits Get Wrong
Retail “20-piece hair cutting kit” bundles often pad the box with accessories nobody needs — extra guard sizes you’ll never use, a cheap neck brush, a mirror that fogs. Meanwhile, the actual cutting shears included are frequently stamped steel, which dulls fast and can’t be sharpened effectively. If you’re buying a bundle, check what the shears are made of before you check how many pieces are in the box. Piece count is a marketing number, not a quality signal.
Storing and Protecting Your Kit
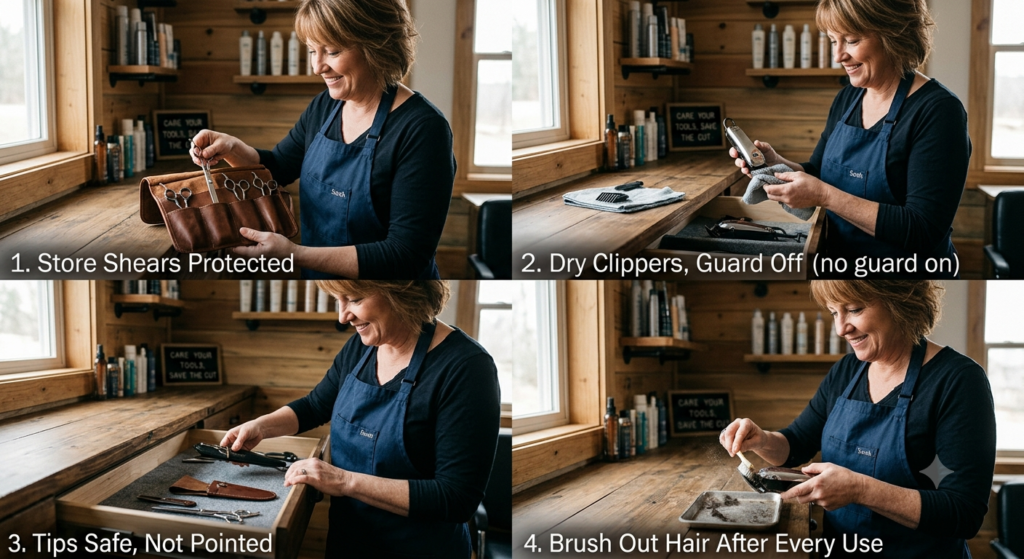
This gets skipped in almost every guide, but it directly affects how long your tools stay sharp. Shears left loose in a drawer knock against clippers, combs, and each other — and a single nick in the blade edge is often permanent without a professional regrind.
A simple system:
- Keep shears in a case or roll, not loose
- Store clippers with the guard off and blade dry — trapped moisture is the leading cause of clipper blade rust
- Never toss shears tip-down into a drawer or bag; the tips are the thinnest, most fragile part of the blade
- Keep a small brush (an old toothbrush works fine) to clear hair clippings out of clipper blades after every use — buildup between the blades is what makes clippers “pull” instead of cut cleanly
None of this costs money. It’s the difference between shears lasting five years or fifteen months.
Hair Cutting Tools Products: How to Evaluate Quality Before You Buy

When comparing hair cutting tools products, four factors matter more than brand name or packaging:
1. Blade Material
- Stainless steel — most common, holds an edge reasonably well, resists rust
- Cobalt/alloy blends — stay sharper longer, better for frequent use
- Coated blades (titanium, ceramic) — often marketed as premium, but the coating is cosmetic on cheaper models; check whether the core metal is actually higher grade, not just the surface finish
2. Blade Construction
Convex-edge blades (beveled to a fine point) cut more cleanly than beveled-edge blades but cost more and require professional sharpening. Beveled-edge shears are more forgiving, easier to maintain, and better suited to beginners.
3. Tension and Screw Adjustment
Cheap scissors often have a fixed tension screw. Better shears let you fine-tune blade tension, which matters because tension needs change slightly with humidity and hair thickness. If the screw can’t be adjusted, the shears can’t be adjusted to your hair.
4. Ergonomics
An offset or crane handle reduces wrist strain during longer cutting sessions. If you’re cutting hair regularly — not just once a year — hand fatigue is a real factor that affects the evenness of your cut, especially in the last few sections.
A quick gut-check before buying: if a product listing emphasizes the number of accessories over blade specifications, that’s usually a sign the tool itself is an afterthought.
What You’re Actually Paying For at Each Price Tier

It helps to know what changes as you move up in price, rather than assuming higher cost automatically equals better results for your situation.
Budget tier (entry-level): Typically stamped or basic forged stainless shears, fixed or minimally adjustable tension, standard beveled edge. Perfectly adequate for occasional trims, bangs, and basic layering. The main tradeoff is edge retention — you’ll be sharpening or replacing sooner.
Mid tier: Forged (not stamped) blades, adjustable tension screw, often a choice between beveled and semi-convex edges, ergonomic handle options. This is where most home haircutters and hobbyists get the best value — noticeably better performance than budget tools without paying for precision you won’t use yet.
Professional tier: True convex-edge blades, premium alloy or cobalt cores, fully adjustable tension, replaceable screws, often available in multiple size/handle configurations to match hand size. Worth it if you’re cutting hair several times a week or pursuing techniques like slide-cutting and point-cutting that demand a finer edge.
The mistake to avoid in either direction: overpaying for professional-tier precision you can’t yet use, or underbuying stamped-blade tools if you’re cutting hair often enough that edge retention and durability actually matter to your budget over time.
Building a Hair Cutting Tools Kit for Different Skill Levels
Not everyone needs the same kit. Here’s how it should scale:
| Skill Level | Core Tools Needed | Skip For Now |
|---|---|---|
| Complete beginner (trims, bangs) | 6″ shears, wide-tooth comb, cape, spray bottle | Thinning shears, clippers |
| Home haircutter (family cuts) | Shears, thinning shears, clippers w/ guards, trimmer, sectioning clips | Convex-edge shears, texturizing razors |
| Serious hobbyist / going pro | Full shear set (cutting + thinning + blending), clippers + trimmer combo, convex blades, sharpening kit | — |
Starting too advanced is a common mistake. Buying convex-edge shears as a first pair of scissors is like buying a manual-focus camera before you’ve learned composition — the tool demands more precision than the skill level supports, and beginners often end up blaming themselves for results that are actually a mismatch between tool and experience.
Hair Cutting Tools for Men: What Changes and Why
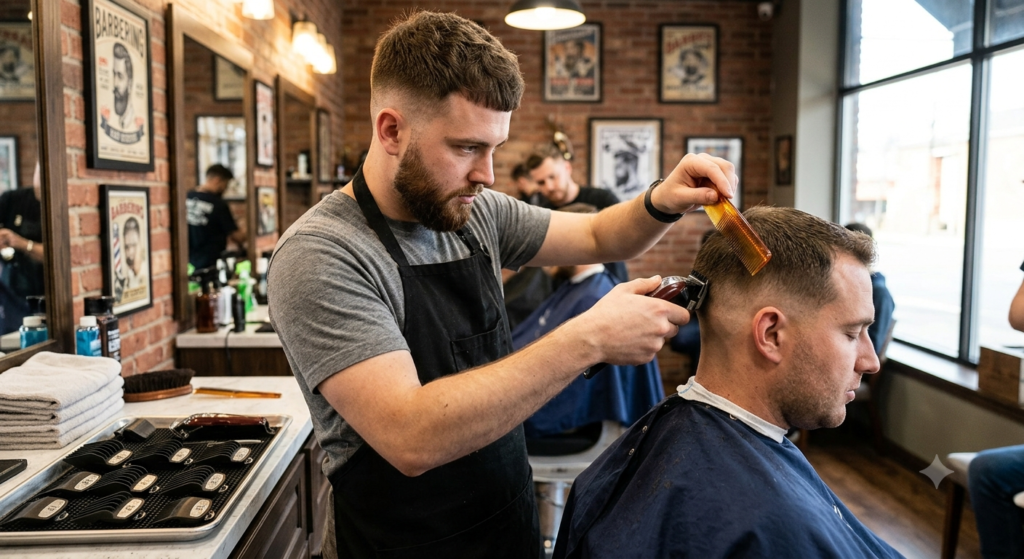
Men’s cuts are disproportionately clipper-and-trimmer-driven compared to women’s cuts, which shifts what belongs in the kit.
Priority tools:
- Clippers with multiple guard sizes (#0–#8 minimum) for fades and tapers
- A quality trimmer for lining up necklines, hairlines, and facial hair — this is often the single most-used tool in a men’s kit, more than the clippers themselves
- A fade comb (angled, flexible teeth) for blending guard-length transitions
The Fade Mistake Almost Everyone Makes
Fades fail most often not from bad clipper work, but from skipping the blending step. Using only clipper guards creates visible lines between lengths. A flat-top or texturizing comb, worked in small upward strokes at the transition zones, is what actually creates the gradient look. If your fades look “stepped” rather than smooth, the tool gap is usually a blending comb — not a better clipper.
Also worth noting: clipper-over-comb technique (holding a comb at an angle and clippering over it) gives more control for textured or curly hair than guards alone, which are calibrated for straighter hair textures and can cut unevenly on coils and curls.
Hair Cutting Tools for Women: What Changes and Why
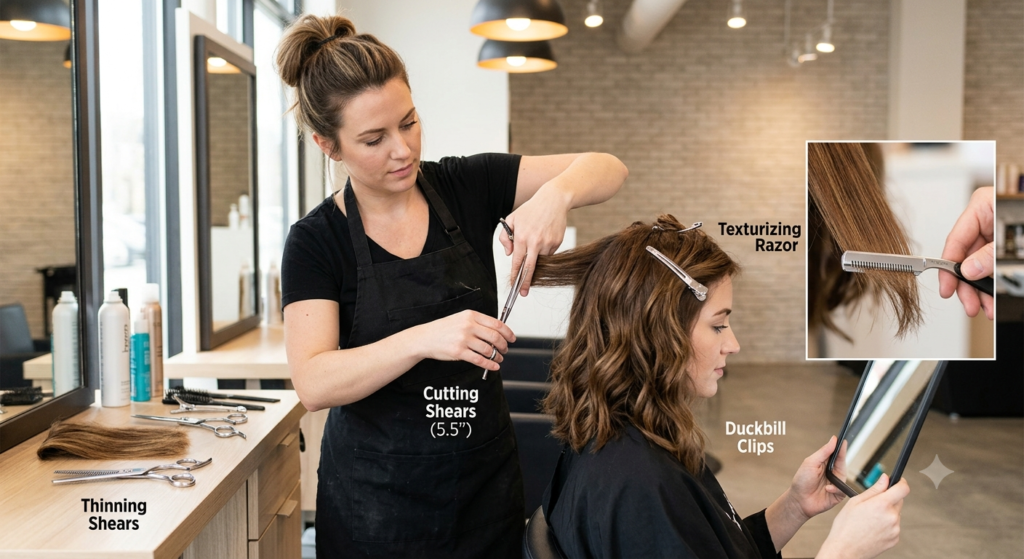
Women’s cuts lean more heavily on shears — cutting, thinning, and increasingly, texturizing razors for soft, piece-y ends.
Priority tools:
- Cutting shears, ideally 5.5″ for precision on layers and face-framing pieces
- Thinning shears for removing bulk without shortening length — essential for thick or heavy hair
- A texturizing razor for soft, undone-looking ends (popular for shags and curtain bangs), though this tool has a real learning curve and can weaken fine or damaged hair if overused
- Duckbill clips for clean sectioning on longer lengths, where regular clips can crease or dent the hair
A Nuance Rarely Mentioned
Thinning shears and texturizing razors are not interchangeable, even though they’re marketed as solving the same problem. Thinning shears remove weight while preserving the blunt shape of the ends. Razors soften the ends themselves, which is a different visual effect. Using a razor when you meant to remove bulk (or vice versa) is a common reason home cuts look “off” without the person being able to pinpoint why.
Choosing Hair Cutting Tools by Hair Type and Texture
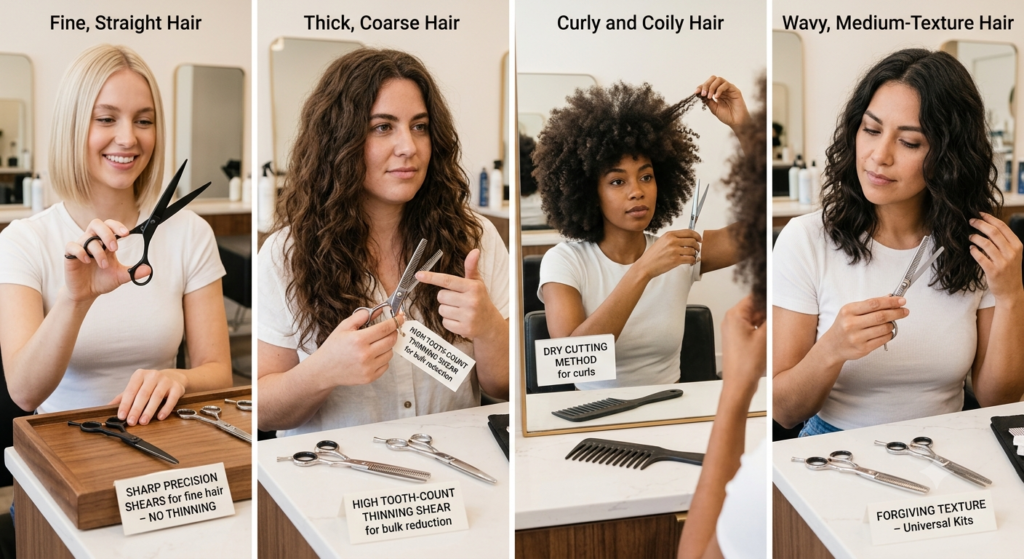
Tool recommendations shift depending on texture, and this is where a lot of generic advice falls short.
Fine, straight hair: Prioritize sharp precision shears over thinning shears — fine hair shows blunt-cutting mistakes easily, but it doesn’t usually need bulk removed. Over-thinning fine hair is a common mistake that leaves it looking sparse rather than lighter.
Thick, coarse hair: Thinning shears become essential here, not optional. Coarse hair holds shape and volume, and shears alone often leave it looking heavy at the ends. A higher tooth-count thinning shear (30+ teeth) removes bulk more gradually than a low tooth-count version, which can leave visible “steps.”
Curly and coily hair: Cut dry, not wet, whenever possible — curls shrink significantly once dry, and cutting wet curly hair to a specific length routinely results in it looking far shorter than intended once it dries and springs up. Clipper guards calibrated for straight hair can also cut unevenly across curl patterns, which is why clipper-over-comb technique (mentioned earlier) tends to give more predictable results.
Wavy, medium-texture hair: This texture tends to be the most forgiving for both shears and thinning shears, and most all-purpose tool sets are actually calibrated with this texture in mind — which is worth knowing if you have a different texture and a “universal” kit isn’t performing as expected.
A Realistic First-Cut Walkthrough (Putting the Tools Together)
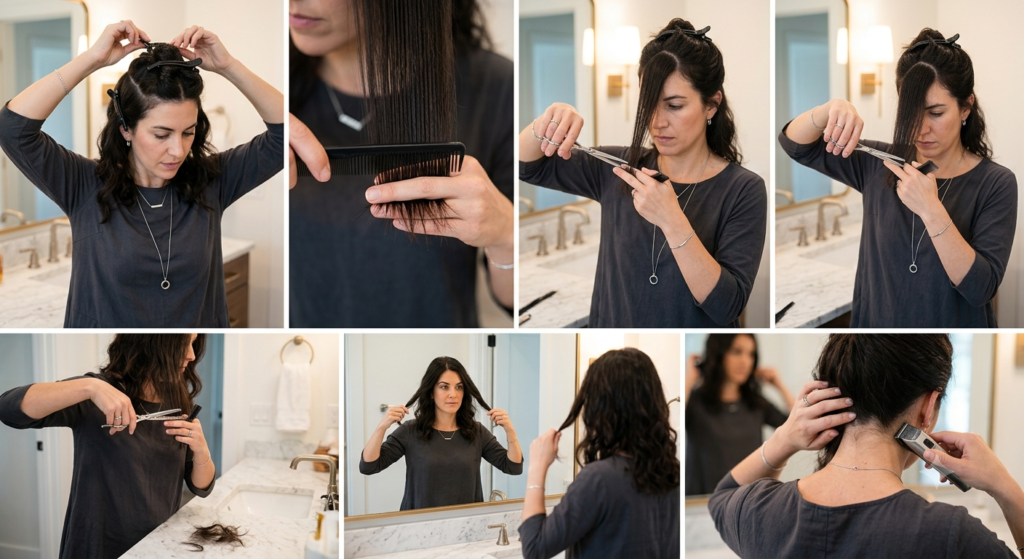
Owning the right tools doesn’t automatically mean using them in the right order. Here’s a simplified sequence for a basic trim, showing where each tool actually comes into play:
- Section the hair using sectioning clips — top, sides, and back, at minimum. Cutting without sectioning is the single most common reason home haircuts come out uneven, regardless of tool quality.
- Comb each section straight down before cutting. The comb isn’t just for detangling — it also shows you the true length and where uneven ends already exist.
- Cut the perimeter first with cutting shears, using a small “guide” section as your reference length for the rest.
- Blend the interior sections to match the guide length, checking against it every few cuts rather than eyeballing the whole head at once.
- Remove bulk with thinning shears, if needed — always after the length is set, never before. Thinning first and cutting length second makes it much harder to judge how much bulk is actually left.
- Check symmetry by comparing matching sections on both sides, ideally with the head level and not tilted.
- Clean up the neckline and edges last, using a trimmer rather than the same shears used for length — this is where a lot of otherwise-good cuts get a rough finish, simply because the wrong tool was used for the finest detail.
Skipping the order — like thinning before setting length, or skipping sectioning entirely — is a bigger source of uneven results than most people expect, even with good tools in hand.
Hair Cutting Tools for Kids: A Different Set of Priorities

Cutting kids’ hair introduces a variable that doesn’t apply to adult cuts: movement. The tools that matter most here aren’t necessarily the sharpest — they’re the safest to use on a moving target.
- Rounded-tip shears reduce the risk of an accidental poke if a child turns their head mid-cut
- Quiet clippers matter more than raw power — many children’s aversion to haircuts comes specifically from clipper noise and vibration, not the cutting itself
- A shorter cutting cape with a snug (not tight) neck closure prevents loose hair from causing itching, which is often what causes kids to squirm mid-cut
- Battery or cordless clippers remove the cord as a distraction or hazard, which matters more with young children than with adults
A blunt-tip comb is also worth having separately from your regular comb — fine-tooth combs with sharper tips can catch on a child’s more delicate scalp.
Common Hair Cutting Tools Mistakes to Avoid
- Using fabric scissors or kitchen shears “just this once.” Fabric-cutting blades are ground differently and will crush hair rather than slice it — plus it dulls the shears for their intended use.
- Cutting dry hair with wet-cut shears (or vice versa) without adjusting technique. Hair behaves differently wet vs. dry; shears designed for one aren’t automatically wrong for the other, but your cutting angle and tension need to change.
- Skipping tool maintenance. Shears need occasional oiling at the pivot screw; clipper blades need cleaning and oil after every few uses. Skipped maintenance is the single biggest reason tools “go dull” faster than they should.
- Buying based on piece count instead of blade quality, as covered above.
- Ignoring hand size when choosing shears. Shears that are too large for your hand reduce control precisely where control matters most — at the tips, during detail work.
Frequently Asked Questions
Do I need professional-grade shears for at-home haircuts? Not necessarily. Mid-range beveled-edge shears are usually sufficient for trims, bangs, and basic layering. Professional convex-edge shears make the biggest difference on precision techniques like point-cutting and slide-cutting, which most home users aren’t attempting.
How often should hair cutting tools be sharpened? For shears used a few times a month, once every 6–12 months is typical. Daily-use professional shears often need sharpening every 2–3 months. A simple test: if hair folds or bends in the blade instead of slicing cleanly, it’s time.
Can one clipper handle both men’s and women’s cuts? For basic trims and layering assistance, yes. But detailed men’s fades benefit from a dedicated trimmer with a sharper, more precise blade than most all-purpose clippers include.
Is it worth buying thinning shears if I only do basic trims? Not right away. Thinning shears solve a bulk problem, not a length problem. If you’re only trimming ends and not shaping or layering, cutting shears alone will cover most of what you need until you start attempting more complex cuts.
What’s the actual difference between a clipper and a trimmer? Clippers are built for bulk removal and blending across larger areas — they have wider blades and stronger motors. Trimmers use narrower, finer blades designed for detail work like edges, necklines, and facial hair. Using a trimmer to cut an entire head of hair works, technically, but it’s slower and harder on the motor than using the right tool for each job.
Key Takeaways
The right hair cutting tools don’t need to be the most expensive ones — they need to match what you’re actually cutting. A beginner doing occasional trims needs a fraction of what a hobbyist chasing precise fades needs, and buying past your current skill level often creates more frustration than better results.
Texture matters as much as skill level. A kit built around straight hair assumptions will underperform on coily or coarse hair no matter how expensive it is, which is why matching tools to your specific hair type is just as important as matching them to your experience level.
If you’re starting from scratch, build in this order: a solid pair of cutting shears first, then a comb and sectioning clips, then clippers or thinning shears based on whether you’re cutting shorter or longer styles. Add a trimmer once you’re doing detail work regularly, and only move into premium convex-edge shears once you’re confident enough in your technique to actually notice the difference they make.
From there, the biggest returns don’t come from buying more tools — they come from maintaining the ones you already have. A well-cared-for mid-range shear will consistently outperform a neglected expensive one. Start with the right basics, use them in the right order, and let your kit grow only as your cutting actually demands it.